Archive for Home built

Falcon Build Update #3- The Roof

Posted in 63 Ford Falcon Project, cars, Home built, hot rod with tags , , , , , on June 30, 2008 by Craig Pike

63 Falcon Wagon Project Build - Roof beforeI think it was Earl Sheib who said, “Body work is glamorous!” He was lying! Ok, I made that up. Body work’s dirty and you have to use a bunch of tools that make noise. I like that part! But, it takes so much time. It’s hard work. This week, I enlisted another friend, Joe Nagy. He came over to hit the roof of the wagon, and that we did. (for a good laugh, check out the Earl Scheib home page and the endorsement from Danny Boneduce)

On the left, you can see where we started. For some reason, I really like wagons, but I guess that was before I wanted to paint one! The roofs, as they’re known, are LONG. I’m pretty lucky that the roof’s straight and basically trouble free except for more of that black primer filled with that strange oil the previous owner used to keep it sorta-shiny. (I already said, please don’t do that…)

Joe and I fired up the wire wheel and DA sander only to find that sucked. pikesan hard at it with Paint stripper: Falcon Wagon projectFrom there I decided to go back to the paint stripper to ease the pain some. Does anyone know of a stripper that actually works? I’m sure it doesn’t help that it’s 90+ in the garage, but still, as much as I put on, you’d think some more of this ratty primer would come off. Not so. Even the “Aircraft” quality stripper I had wasn’t that hard core. I want the paint to peel off in one big sheet! But, I also want my kids to have clean air and clean water. I bet in the old days, paint stripper got it done! Here’s what the paint stripper did. Any paint that does peel off is still paint I don’t have to force off.

Much more later, we’re just getting started. Stay tuned. Any comments on the progress?

Work on Custom Cars – Read More

Update: 1963 Ford Falcon Project Build

Posted in auto, cars, custom, Home built, hot rod, Vintage with tags , , , , on June 27, 2008 by Craig Pike

1963 Falcon body work updateIn case you missed the last story, I’m rebuilding my 1963 Falcon Wagon. Originally, I just planned to put some paint on it and re-do the interior, but after inviting a bunch of friends over (here’s the story), my wagon’s now a stripped hulk sitting in my garage. Borderline panicking but not quitting, I’ve still got great friends helping out. We’re making progress. It’d be easier to get out to the garage if it wasn’t 112 today!

The first thing I should mention is the “How-to” I wrote in my garage. In addition to adding pics of your ride, you can also use your garage to help others by showing how you did something… like a tech page. I filled in the backup lights in the tailgate of my wagon and wrote a “How-to” about it. If you ever need to patch a small hole, it might be an interesting read. Click HERE to see it.

You should read the rest of the story! CLICK HERE

Falcon Strip Party Update – What not to do…

Posted in 63 Ford Falcon Project, cars, fabrication, Home built, hot rod, Paint with tags , , , on June 23, 2008 by Craig Pike

1963 Falcon Wagon project updateIn case you missed the last story, I’m rebuilding my 1963 Falcon Wagon. Originally, I just planned to put some paint on it and re-do the interior, but after inviting a bunch of friends over (here’s the story), my wagon’s now a stripped hulk sitting in my garage. Borderline panicking but not quitting, I’ve still got great friends helping out. We’re making progress. It’d be easier to get out to the garage if it wasn’t 112 today!

The first thing I should mention is the “How-to” I wrote in my garage. In addition to adding pics of your ride, you can also use your garage to help others by showing how you did something… like a tech page. I filled in the backup lights in the tailgate of my wagon and wrote a “How-to” about it. If you ever need to patch a small hole, it might be an interesting read. Click HERE to see it.

Ken busy working on my 1963 FalconFirst off, I have to mention the tireless help I’ve been getting from my friend Ken Ford. (perfect name for the project, right?) Ken’s a body guy and was looking for a reason to get dirty on a project. He’s got a Harley at home now has built several VW’s in the past, including a few vans, so he knows how to get body panels looking good.

It’s a good thing too! We’ve been moving around the car looking for disasters. We really only found 1. The previous owner decided to fill the cowl vent. I guess it looks a little smoother, but I’d leave it. (too late now!) I wouldn’t mind putting it back either cause it might be easier when you see the mess he left. Cowl vent removed messWe knew there was a problem there because the bondo had cracked. When we got to work cleaning it out, this is what we found. It’s hard to see from this picture, but there was about 1/2 inch of bondo covering this patch panel. He didn’t finish-weld the patch, so I think some moisture got underneath it and cause the cracking. This is gonna require some minor surgery to repair. I think it might actually be easier to find a new cowl and put it in. What do you think?

Step 1, the before grinding floor: 1963 FalconWhile Ken’s been hitting the outside, I’m inside cleaning the floorpan. It looked pretty nasty at first, especially in the pics. Really, it’s not that bad. Everything all rusty colored, but there was only one small spot of cancer rust. I’ll write about how I handle that in another blog. Here’s the before, during and finished pics of the floorpan. I’m going to use POR-15 to seal the floor up, then insulate the hell out of it with the insulation from Auto Insulation. I removed about 20lbs of muck and filth from the car. Ever wonder where that “old car” smell comes from? I can tell you! I’ve also included a pic of the rear floor. I hit this thing HARD with a wire wheel and it still looks pretty nasty. I’ll cover it with carpet anyway, so it’ll get more POR-15.

The during shot. Floorpans of 1963 FalconThe finished floorpans - ready for POR-15 1963 FaclconCancer, but operable: 1963 Falcon WagonRear floor 1963 Falcon wagon

So here’s the progress on the rest of the car. We had to strip off all of the old black primer. The previous owner used some kind of oil or something, (I thought it was Armor Al) to keep the primer looking somewhat shiny. Whatever you do, don’t do that. Ken was using up DA sanding paper like crazy with that crap loading up. The cars all spotty, but when Ken throws down some primer, it looks good. I hit the front fenders with some paint stripper and then with a wire wheel to get all the black off. It’ll look worse before it starts to look better.

1963 Falcon body work update Front fender progress 1963 FalconPaint Supplies from ARS in Gilbert

I also included a shot of the first of many paint supplies I’ll need. The guys at ARS, Automotive Refinish Supply in Chandler hooked me up a little and are going to try and help get PPG to sponsor the build. Brandon at ARS didn’t mind waiting a bit since I came right from work, even on a Friday evening. Its nice to work with good people. Rather then buy this and that from a swap or an auto parts chain, I’m buying all quality supplies. With all the work we’re putting in, I want this to be nice.

Brandon also started helping with colors. That’s gonna be a tough choice. I know it’ll be blue cause that’s what my kids want. I know the car was originally Heritage Burgundy. It’s a cool color, but it ain’t blue. A friend said that Ford offered a light blue similar to what I’m looking for in 1963. Brandon said to look at www.AutoColorLibrary.com to find the color. Glacier Blue or Peacock Blue might be cool. Brian from Problem Child Kustoms Studio might have to make the final choice for me. I’ll trust his expertise.

That’s it for now! Thanks to my current sponsors:

1969 Chevelle After two decades….

Posted in cars, Home built with tags , , , , on April 11, 2008 by Craig Pike

…things are bound to change. Just about 20 years have passed (we’re about a month-and-a-half shy) since this photo was taken:

1969 Chevelle

It’s my old Chevelle, and the pic was snapped as the car was being completed… this being roughly my Senior year in high school (note lack of tail pipes and trunk lock cylinder, among other important items). I bring this up on roughly the tenth anniversary of selling the car, after moving to CA in the late-90’s, and, surprisingly, after my father ran into the car once more in Pleasanton, the very grounds where the old girl was passed to a new owner. In any event, it’s kind of funny to look back at the changes. I bought the car (with help from my parents… I had a very cool and supportive, hot rod-oriented mom… how killer is THAT?!) as a near basket case (here it is in progress)

1969 Chevelle

…and with a ton of guidance and help from my father and a few close friends, brought it back to life (in the form of the lead photo). Fast-forward a few years, and things were shaping up on it, with some new wheels and aggressive rubber, all setting the tone of a late-’60’s/early ’70’s street machine (OK, with updated wheels… hindsight yells “shoulda kept the slotted mags!!”). The tall stance and big meats were part of it, as was the period cool crushed velvet interior:

1969 Chevelle

It was a fun car… not the fastest, by any stretch, but respectable enough. It was a clean car that had a classic look, and looking back on it, was an amazing car for a late-teens/early twenties-age guy going to school.

1969 Chevelle

It packed attitude, and that black paint was a constant source of pride (and time-swallowing detailing), and the monster even saw the first snow on one notable occasion. It was a reliable, almost comfortable car, considering the ride height…

1969 Chevelle

Fast-forward ten years after selling the car to head back to school, and I get a phone call from my dad, at the Pleasanton Goodguy’s event. “You’ll never guess what I’m standing in front of,” he says. “The disembodied, floating head of Elvis?!” I ask, really wanting a picture… “No, you (expletive), your old Chevelle.” Very cool indeed… The old girl is alive and well. Granted, like any personal project, the new owner has taken the car and personalized it, as anyone might make something their own, creating a vision they can be proud of. The car has a new life, yet continues its rebirth, which is an awesome thing. See if you can spot the changes:

1969 Chevelle

Rally stripes, new wheels, a front valance…

1969 Chevelle

New seats up front (the rear remains!), updated gauges, speakers, and so on….

1969 Chevelle

Problem Child Kustoms Studio…but most amazingly, the black paint that was laid upon the car in ’88 is still looking deep, shiny and straight… Seeing that work live on made my day. It’s testimony to spending time in the right places, and taking pride in anything you do… a lesson I’ve been trying to teach my kids in all they do, and was illustrated perfectly in a car none of the three are old enough to recall. In any event, long post, I know… But I thought it was cool to share a project that spans two decade, two owners and two very distinct styles, but shares the same basic foundation.

May all your first projects carry on as long…

Written by: Brian Stupski of Problemchildkustoms.com

MyRideisMe.com teamed with Dub Wheels Pimpstar

Posted in cars, custom, hot rod, Humor, technology with tags , , , , , , , on April 1, 2008 by Craig Pike

In addition to the sleek new set of 26×10″ wheels and tires from Dubs, I’ll also be installing a new LT1 fuel injected crate motor to replace the pinto power!

Check out these new rims! (They make spinners look like 13″Centerlines!) Gonna be ROLLIN baby!!

go back
Oh, and APRIL FOOLS! (did I get’cha? Please leave a comment)
(MyRideisMe.com is not receiving advertising money from Dubs, I just thought this was outrageous and a good prank for April 1…)

Finally Assembled! Pinto baby!

Posted in cars, custom, fabrication, Home built, hot rod, welding with tags , , , , , , , on October 29, 2007 by Craig Pike

I’m not sure when I started working on this project, but it was at least 4 years ago. I wanted to build a trick intake setup for my Pinto Powered Roadster called Bonnie. Bonnie’s always turned heads, even parked next to MUCH higher dollar rods. I have to admit that I like that. The intake design is from a tech article I read from the Inglese website. It explains why individual runner intakes and weber carbs are the hot setup.

Now, with the new intake finally on, I’m gonna get more people asking, “What engine is that?”

So here’s where I left off… the last thing to do was weld the flange that would hold the throttle cable:

img_2729.JPGimg_2730.JPG

Then finally, here’s what it looks like all mounted up. I can’t wait to spend hours trying to tune this thing!

Nasty HeaderMy Ride is Me!!

If you have a build you want to show on the front page, get in touch with us! Pikesan . We’d be happy to feature your ride! Get building!

Build a Roadster – Read More


Gearing up for Scottsdale Goodguys Show

Posted in cars, custom, fabrication, Home built, hot rod, rat rod, welding with tags , , , , , , on October 15, 2007 by Craig Pike

Some how while trying to make this website and taking care of my family, I’m also working on my Pinto Powered 27 Ford Roadster, “Bonnie”. I thought I’d update everyone on the progress. I’m doing this so that all of the 230 users of My Ride is Me will do the same! We’re talking to our web designer about how to show EVERYONE’s blogs all in one place. That way, we can all keep up with what’s new.

First off, here’s the car… if you haven’t seen it yet, I haven’t done enough self promotion! (hardly possible) This is what it looked like before the 2006 Goodguy’s show.

Bonnie: 2006 Goodguys

That red paint you see on the header is GONE (as soon as it got hot!) and the car hasn’t been that clean since! Plus, the paint (primer really) had faded here and there unevenly, so here’s what I’m trying to finish before the show:

1) Custom dual Weber 44 IDF carbs. Here’s a few pics:

The intake I made (3 years ago!) How the carbs are linkedCarbs on the intake.. looks sweet!  Mock up of throttle cable plateDual purpose-hold tubes and hold throttle cable

I’ll post more pictures when I make some progress… that’ll have to be soon or it’ll look exactly the same as last year! *not gonna happen!*

27 Ford Roadster -Read More


Father and Son Hot Rod Team

Posted in cars, hot rod with tags , , , , , on August 31, 2007 by Craig Pike

TwoCars

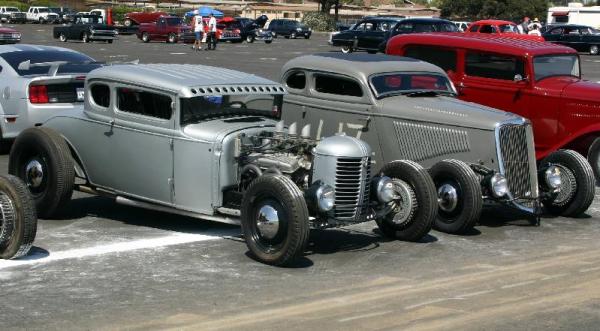
Ray and Rory Forbes, this father and son team, came all the way from Reno, Nevada to enjoy the 2007 LA Roadster show. Believe it or not, these guys didn’t get to join the official show because they don’t have shinny paint. I wouldn’t have it any other way! Check out this awesome pair of traditional rods!

Dad’s got style!

PopsCar

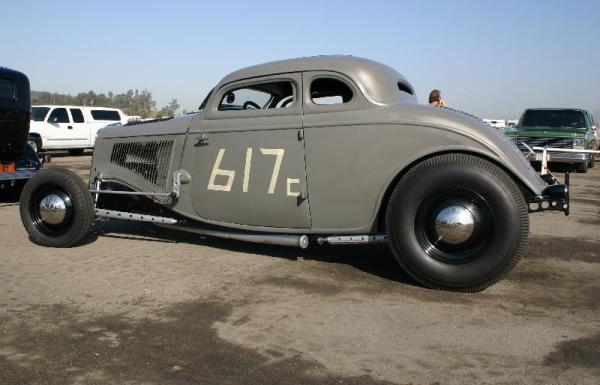
This is Ray’s 1934 Ford. Construction began in the 40’s with a top chop suitable for Bonneville, but the project stalled when the men building the car were drafted. After that, the car got passed around until 2 years ago when Ray bought it from a guy who had stored the car for 30+ years, untouched due to health reasons. It was a full build done entirely in the Forbes’ garage on weekends by Father and son. The 34 has an early 60’s 401 Buick Nailhead donated by a friend who was an early 50’s Bonneville racer that ran a 34 Coupe way back when (hence his # on the door, plus the original timing tag!) Inside, it has super rare P-51 stainless seats, custom pedals, an engine turned dash filled with vintage S&W gauges, Schroeder steering and out back a quickchange rear end. To cap it all off almost every nut was safety-wired right down to the taillight mount!

Just add salt.

High School Dream car?!

Rorys

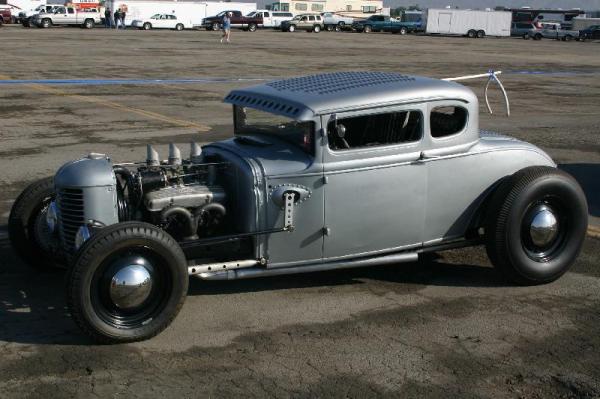
Can you imagine driving this car in high school? Rory did and it’s the first car he built! This Model A coupe has a generous 6″chop and is covered in louvers. When I asked how many, Rory just said, “A ton!” I especially like the late 30’s CASE tractor grill and period looking engine with finned scoops and matching valve covers. Inside, there’s original Weber Aircraft bomber seats still wearing the original paint with vintage aircraft lap belts. Like dad, black steel wheels with caps roll on bias-ply tires.

This is the kind of story you’ll find at MyRideisMe.com. I hope you’ll check it out!